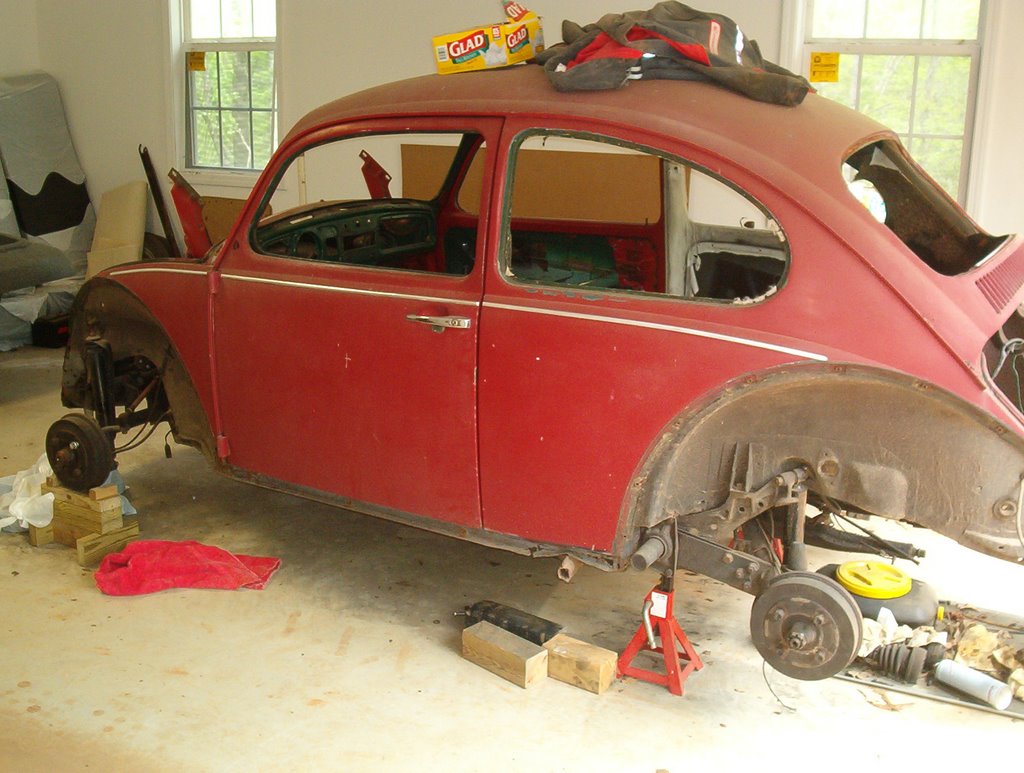
Friday, September 29, 2006

Slow going.

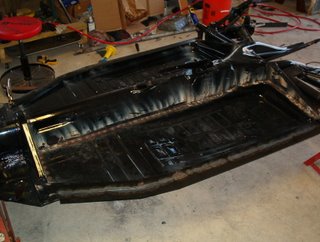
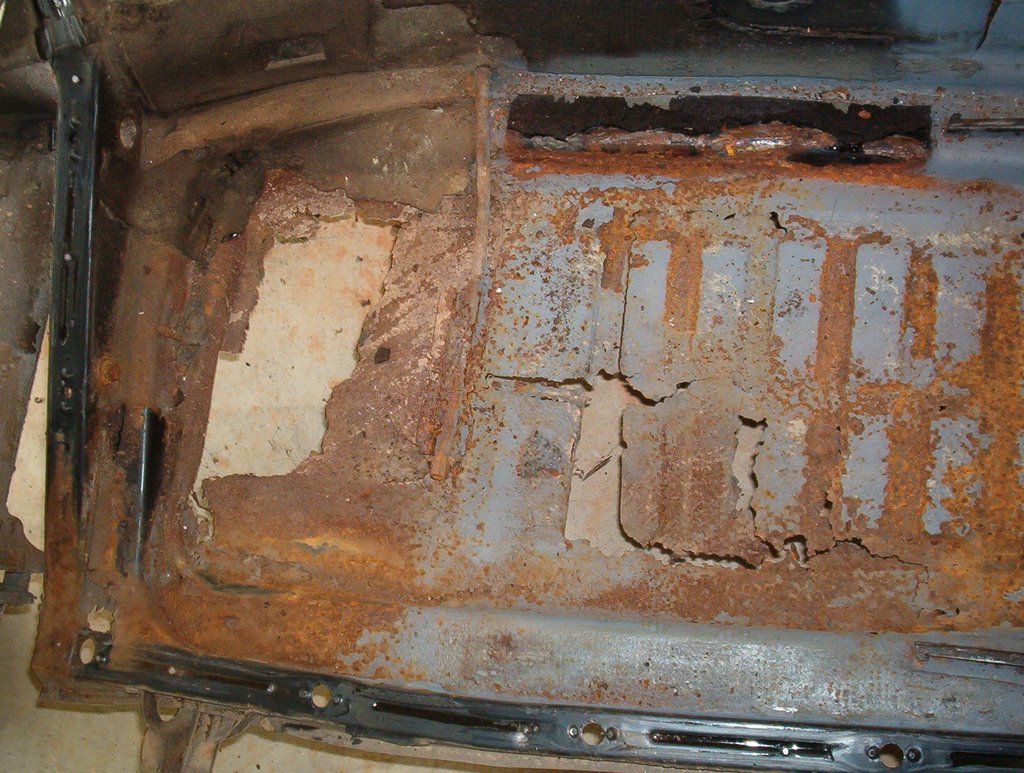
After welding the floors in place I added another coat of POR-15 to the entire pan. When I finished the second coat, I top coated the underside with Herculiner, a brush on bed liner that is available at your local auto parts stores. I found, when applying the liner, that blotting with the brush is more effective than brushing it on. It seems to go on more evenly that way. I haven't actually tried rolling the stuff on yet. I will get to that when I apply it to the underside and inner tub of my body.

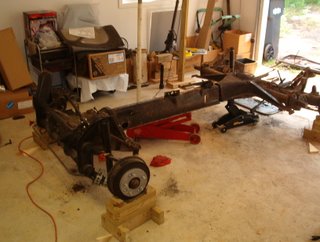
I flipped the pan over one last time and started working on all the suspension components. I broke down the front beam, replaced all the bushings and filled it with fresh grease. I also had my mechanic machine my drums while I was getting an oil change for my other car. One drum needed to be replaced and I picked it up from NAPA on the way home. I reused the old shocks because they weren't that old and probably are better being a little worn on the lighter car anyway. I replaced the short tie rod because I destroyed the ends when I was breaking down the beam. An inspection of the ball joints showed that they were still good. Cleaning and painting all this stuff was a disaster of a mess. I had grease and rust all over the place. Reassembly of the front beam wasn't too hard. Just the reverse of taking it apart. I replaced all the nylock nuts on the front and many of the bolts as well. Another thing I've learned in my travels is to never re-use lock nuts or lock washers unless it's an emergency. Once you use them the first time they lose some of their locking ability. The reason you want lock nuts and washers on in the first place is so they won't back off. And they're usually used on critical parts so don't cheap out. Get yourself a fifty count bag of each of the most common types (M8 M10 M12) so you'll have plenty on hand.


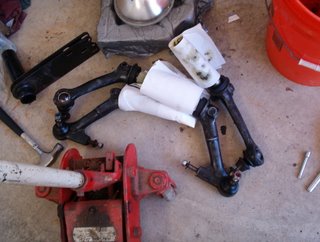
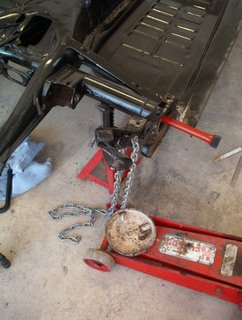
When I finished the front beam, I turned my attention to the rear suspension. When my car was still a bug the rear sat a little low and my camber was off. I decided to try the procedure here to correct the problem. I had to break down the trailing arms in order to replace the bushings anyway and I also needed to replace the torsion bushings a well. This project was a bear because I did it on my own. The biggest problem I had was that the pan was so light that, when I would jack the spring plates up, the front end of the car would come off the jack stands. I spent the better part of a day trying to weigh down the front of the car so I could get the job done. I ended up using my wife as the weight up front and it still came off the stands a little bit (She's not heavy). I eventually got the job done and putting the spring plate covers back on was a bear as well. I replaced the bolts here with stainless so I can keep them nice and shiny in the future (since they will always be visible). The problem I ran into was that the heads of the bolts I bought were a little larger than the originals. I couldn't get a socket on them and had to turn them with an open end wrench one tiny bit at a time. I'm gonna hate myself If I ever have to break these things down again.


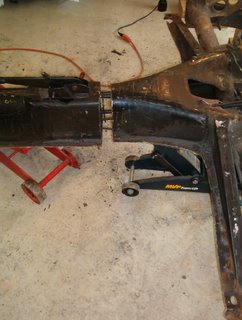
After I finished with the spring plates, I reinstalled the trailing arms and went to work on the rear stub axles and brakes. I had a bunch of problems here. First off, I had taken the axles apart long ago and completely forgot which bushing goes where when I put it back together with new bearings. There was no complete break down of the rear axles in any of my books. There are for swing axle cars but not for IRS. Thanks to message boards and and exploded view I managed to print, I figured it out. The second problem I ran into was something I didn't realize until I had the rear breaks almost completely reassembled. I put the backing plates on the wrong sides of the car. Only when I went to hook up the parking brake did I finally realize my mistake. I also cheaped out and tried to reuse my brake cylinders at the wheels. I knew better but they were clean and seemed to be working fine. I found out, while I was bleeding the brakes what a mistake this was. I ended up with two of the old cylinders leaking. So I had to tear them down, yet again, to replace what already should've been replaced anyway. "Going is optional, but stopping is absolutely imperative." This has always been one of my favorite car sayings. I should listen to myself more often.

Saturday, September 23, 2006

Point A to point C? Where did B go?

If you're observant you noticed that in this post the tunnel and floor pans get mysteriously darker as the pics progress. This is because I started to apply POR-15 rust preventive paint to my car as I went. While I was working on the floors I was also doing surgery to the tunnel and front bulkhead.

The tunnel was all surface rust and fell under the ever present wire wheel to address those problems. I did have to weld an area on the passenger side where an access hole had been cut. In 1968, Beetles could come with your standard manual transmission or an autostick which is sort of a hybrid of an automatic and a four speed. I believe that my car was originally an autostick because it had this hole cut in the tunnel and it has an IRS rear. This access hole was cut to get at the innards to convert the car to a manual. Independent rear suspension didn't become standard on bugs until 1969. I caught a lot of flack about this when I ordered stuff for my car along the way. I would call looking for a bearing or something and the pros would give me a ration of crap when I told them my '68 had IRS. One guy even insisted my car was a '69. I checked the serial number and told him he was wrong (always fun to tell a pro he's wrong.)


The front bulkhead (frame head) had some serious cancer on the underside. Ideally I suppose I should have replaced it but I really didn't want to go through that headache. I assessed the damage and decided I would just cut the bad portions out and, with my new fangled welder and my ever growing skills, weld some patches in. The worst area was the bottom of the bulkhead just behind where the front axle beam bolts up. I cut away the bad portions till I found clean steel. After that I had to deal with the areas further back. Back there I did the same thing. I broke out the can of POR-15 and went to town after cleaning up the area. I buy the little six packs of POR-15 because once you open the stuff in must be used up. At any rate, I wedged as much paint as I could inside the holes and painted the tunnel and bulkhead with my POR. A little can of the stuff goes a long way. When I was done with the paint, I fabbed up some suitable patched and went to work with my welder again. Rust fixed and then coated the entire pan, once again, with POR-15. Slow going but looked nice when I was done.


Friday, September 22, 2006

Dude, What's taking so long.

Earlier I commented on how it seems to be taking me forever to get this car done. I feel like I've been working on it forever and my personal deadline was August for completion. This last weekend was a perfect example of exactly why it seems that I'm always behind my mental schedule. I spent many a hour in the garage tinkering with this and tightening up that. When the dust settled, all I could say that I accomplished was that I installed my CV axles and glued down some seal on the pan. Then I looked around and found where at least one hour went.


These are the old spacers used to hold the beetle body in place. The one on the right is the before and the left is after I beat it to death with my wire wheel. I decided to reuse these because they're nice and thick and will work well along my angled steel sides. The thing is, I'm still going to have to treat these with some paint or something so they don't instantly start rusting when I put them on the car. The endless list of little things keeps growing.

Thursday, September 21, 2006

Assumption is the mother of all screw ups.

When it came time to weld some new floor pans on the car I has a brilliant epiphany. I decided to buy the 1/2 floor pans from JC Whitney. I figured, "I'll have to cut the darn things anyway so I'll just buy them already cut." When they arrived I clamped them on the tunnel and started to devise the best way to shorten them up. I decided to trim the fourteen inches off the front floors (ie near the pedal assembly) because it seemed easiest. The floors from JC arrive with extra meat on the inner edge (along the tunnel side) so you can trim them up to your exact needs. In order to fit them, I needed to trim, fit, trim a little more, fit them up, trim some more, fit again, trim some more, fit and motivate with a hammer, ect ect ect. Needless to say, it took some time to get it to fit nicely. Once I did, quite proud of the work I had done, I clamped the floors to the tunnel and grabbed my body for a test fit. Only then did I realize my mistake. The rear floors flare out in the section where you would normally cut the pan. Consequently I had about one inch of metal poking out further than my body.


DOH!!!
Thus a whole days work of cutting and fitting went down the tubes. And that was just for the drivers side! I sat on my work stool and stared at the car dumbfounded. I contemplated my next move. I had a few options.

1. Scrap the whole mess buy some new full pans and start again.
2. Go a completely different route and make my own floors. I wasn't all that pleased with the gage of the metal the JC pans. They were solid but not quite as thick as the German originals.
3. Make the current plan work somehow.

I decided to start from scratch and build my own floors. I started by getting some 2 inch angled steel to run along the outer edge as a support. I lined them up using the body as my guide. I cut a small wedge where the bends were and welded the pieces back together on the horizontal section. I mocked them up and was pleased. I felt more comfortable with 1/4 inch steel along the lower sides than even the thin sheet of the original gage floors. After I had the sides done I went about tackling the actual floors. I searched locally for some suitable gage sheet to use as a floor while I decided the best course of action to fab them. If you look along the lip of the pan you'll discover that it's not flat so you can't just buy a sheet of steel and flop it down for the floors. This would require me to do some serious shaping and at least another day of fitting. I wasn't sure that my skills and tools were up to the task. To make matters worse, I found that a flat piece of sheet metal of suitable dimensions would cost me more than buying completely new full floors. I sat in my garage feeling sorry for myself after hitting an apparent impasse. As I sat there I noticed my 1/2 pans leaning against the wall mocking me. I hatched a brilliant hybrid of #2 and #3 above. What I did was cut the outer edge of my current floors off where they bend down along the outside. This alone gained me 3/4 of an inch from my 1 inch overlap dilemma. With this gained I did some careful trimming and PRESTO I made my already purchased floor pans work by tucking them under the lip of my two inch angled steel. I welded the floor as normal along the inner lip and welded the bottom floors on the underside of my two inch angles. Disaster averted.


A note to the wise. The thin nature of the pans and the fact that I was too cheap to actually invest in shielded gas and thinner wire for my welder means that I had difficulty welding the floors. The shielded wire is intended for thicker metal and will burn holes in the thin sheet if you aren't careful. I tweaked the settings and my technique until I mastered it. It worked well along the edges where there was more meat from the original steel to supplement the floor metal. The area across the open floor was altogether too thin to prevent me from burning through. I know because I practiced on the portions that I cut from the front halves. Welding was out so I bought some steel pop rivets and riveted the two halves together. When it was all done it came out well and I tested it by hopping up and down on the floors (very scientific huh.)


A little, often overlooked, tidbit that I've picked up in my travels is to avoid using different metals when they will come in contact with one another for any period of time. The chemical makeup of dissimilar metals can induce or accelerate corrosion or rust. That's why I specified STEEL rivets because aluminum rivets are equally available in most hardware stores. If you have some on hand and you're not sure just grab a magnet. It wont stick to aluminum. Good quality stainless steel is non magnetic as well. If you take a magnet to "stainless" and it sticks, there's a good chance it will rust in the future.

It was a huge relief to get the floors on and took me way to long but I got-r-done (as they say here in Georgia) and was able to move on to much more mundane things like cleaning more rust. Yay!

Monday, September 18, 2006

Wheels make the car.

I've always thought wheels can make or break a car. You can take the biggest piece of crap car on the planet, slap some decent wheels on it, and it will gain 30 or 40 cool points. Originally I planed on using some old Chevy S-10 wheels on my car. I figured I could get them pretty cheap and they would be pretty cool. I was at my local garage getting some service done to my other car and I made the mistake of running through their wheel catalogue. One set of wheels started speaking to me. I asked the manager if he would order me one wheel to see how it would look on my car and check if I could mount it without any problems. He was cool enough to order one in, let me take it home, and fit it without charging me a dime. He's a smart business man because, once I saw the thing on my car, I had to have the set. The wheels and tires I bought are the most expensive single purchase I've made to date.


During on of my test fit sessions with the body I mounted the wheel to make sure it would clear. I was in love and ordered the rest. If you look at the pan, you can tell that it hadn't been cut yet.


When I got all four in, I mounted them all up and sat in awe at how cool I thought they were. I got all over excited and didn't think before I had tires mounted. I should've waited till I was almost done with the car so they won't rot or develop flat spots. Oh well, live and learn.

Sunday, September 17, 2006

Side note.

Progress on my car has always been slower that I thought. I tend to take my time and try to do things right. I've made plenty of mistakes along the way. There is a steep learning curve when you've never attempted anything of this nature before. It seems that every stage of my build I've been very cautious and also messed up here and there (luckily nothing was critical). As I continue this blog and look at the pictures I've taken, I'm surprised at how little it seems I have done. I would say that most of my time has been spent beating 38 years of rust, grime, and paint off my old parts. Once again my cheap side outweighed my lazy side when I didn't invest in a bead blaster to clean parts. I've used a combination of my ever present die grinder and a two dollar drill with a wire wheel I bought at the flea market to clean my stuff. Nothing is untouched. I've replaced every bushing, sanded the tunnel, cleaned and treated every part, torqued every bolt, replaced every lock washer, and changed all the seals. It seems that every time I've tried to take a short cut it's come back to bite me in the butt. So keep in mind, as you read this, that I'm leaving out a great deal of the boring stuff that is an absolute requirement when you're building a car.

Two very important things to keep in mind as you do something like this are...
1.) Everything always takes longer than you think it will.
2.) Take the amount of money you think it'll cost to do the job, multiply it by three, and you will still be a little short.

It must also be a labor of love. If you can't curse the car lovingly, just buy a finished product and save yourself the aggravation.

Saturday, September 16, 2006

Measure 150 times. Cut once.

When it came time to actually cut my tunnel in half, I was a little nervous to say the least. I knew, once I made that cut, there was no going back. So I read reread and read again the instructions on the Manx club site. I whipped out my tape measure and my big level. I test mounted my Clodhopper body and measured the length I would need to cut from my pan. I took the body off, put it back on and measured again to make sure I was right. When I was satisfied, I came up with 14 1/4 inches to be cut out. Different body styles require different lengths. Even if mine came with instructions, which it didn't, I still would have test fit it to make sure nothing was funky with my particular pan. I measured everything and made sure I could duplicate it when I finally did cut the section out. I turns out that my pan was a little off in the stock configuration. It is a little more than 1/16 of an inch longer on the passenger side.

Distances were recorded from the front shock towers to the rear shock supports where the beetle body was originally attached. I took measurements straight from one bolt hole to another and in an "X" pattern as well. I also recorded some secondary measurements in the same fashion. These were made on the tunnel itself.

Before I did all of this I built four of these out of scrap wood my wife had. (Thanks babe!)


I fit them under my brake drums on all four wheels and also cut some small wedges out of 1x4" pieces (those wedges have come in handy for a million other little things along the way as well.) I used the wedges to jam under the drum blocks in order to level the car on all four sides. It worked out great and allowed me to use both my floor jacks to fit the car back together and fine tune for welding when the time came. When I made my cuts, I used my handy dandy die grinder. Even if I had a reciprocating saw I still would've used the grinder because I definitely didn't want to cut any of the lines running through the tunnel. In the end it all worked out fantastic and I was very pleased with the results. One thing I did different was to weld a portion of my cut out to the top of the tunnel as a reinforcement. It isn't beautiful but will barely be noticeable with the seats installed.

Here you can see the tunnel after my cut. If you look closely you can see the wedges for leveling next to my drum blocks.

Clean cut, no lines hurt.

Finished with welding. Measured and tacked it before running the final beads. Note the cut out peice I welded to the top to help reinforce it. This was made from a protion I cut out you can see the old hole where the seat belts originally ran.

Tread lightly with your cutting tools.

After stripping the body off the pan I cut the floor pans off because they were completely unsalvageable. The passenger side was completely rusted through and the drivers side had been reinforced with fiberglass at some point to fill the holes it was hiding.

Note: I cut the floors off after I did a test fit of my body and recorded the appropriate measurements.

99.99% of the cutting I've done has been with a die grinder and a three inch metal cutting wheel. In retrospect, if I had a reciprocating saw or a nibbler I probably would've saved myself tons of work hours cutting all types of metal. This is one instance where my cheap side beat out my anal side. Normally, I would buy the right tool for the job but I've already got tons wrapped up in tools already (A new compressor and the welder come to mind.) Plus every dime I spend on tools is one less dime I can spend on the car itself. Hind sight being 20/20 I would've sprung for some more "industrial" metal cutting equipment.

Back to the pan. There is a lip along the inner edge of the floor pans where they meet the tunnel. You can see it if you look under the floors near the tunnel. I cut the floors off just outside this lip. After that I took a chisel and broke the spot welds that held the remaining floor metal to the lip. Where the chisel wouldn't work, I drilled out the welds (in the floor metal only not the lip) that were more stubborn. You can see where these welds are if you use a wire wheel to clean the metal up. They look like round little 2mm imperfections or indentations in the steel every inch or so. Try your best not to mess up the lip along the tunnel as this will be where you reattach the new floor pans later. When I finished I cleaned the lips to bare metal with my wire wheel. After the cleaning, I applied WD40 to the bare metal spots to prevent surface rust from reappearing over night. When you live in humid Georgia rust WILL appear overnight if you don't treat the bare metal. When I was done, all that was left was the main tunnel and it looked like an "I" from the top.

Split personality.

Throughout the build process, there has been a constant battle between my cheap/lazy side and my anal side. One part of me wants to make the car perfect. The other wants to save as much money as possible and get it running. My goal has never been to build a show car. I'm a firm believer in cars are for driving. A show car that sits in the garage only to be pulled out and put on a trailer in order to collect more trophies is a complete waste of steel in my book. I can understand the passion and effort that people put into their cars and they look fantastic all detailed up with the wheels off and mirrors everywhere but it saddens me that they got so carried away building it and spent so much money that they're scared to take it for a spin for fear they might get it dirty, chip the paint, or (god forbid) smash an insect on the windshield. While building my car I can see how easy it would be to get carried away. I could easily cross over into making the car perfect but that would defeat my purpose. In the end, I'm building fun transportation not an oversized model. This ying/yang conflict has influenced many of my decisions along the way.

Friday, September 15, 2006

Cutting and welding. aka What were you thinking?


After hauling the body away, I was left with a pretty rotten pan. I set upon cleaning the thing up while in a frantic search to find someone with some welding skills to shorten the pan. I searched far and wide for the right individual or shop to do the job. I found several friends and mechanics that had welding abilities. They were all ready to help me out until I told then exactly what the job entailed. Then they were not so confident and backed out.

For those who might be reading this and are unfamiliar with a Manx style dune buggy, it's important for you yo know that 90% of the kits out there require that cut out fourteen or so inches of the pans main tunnel and floor pans. So if you're thinking of starting from scratch with a Beetle donor car I would advise you to work out a shop who is willing to do it beforehand or brush up on your welding skills. Most of the shops will tell you that they can weld for you until you tell them that you're cutting the car in half. Then they back out for liability reasons. About the only folks who will attempt it are air cooled VW shops and even then you can run into a road block.

After finding no one (locally) willing to do the job, I finally broke down and decided to do it myself. I looked for instructions on how to properly shorten the pan and found it here.

I bought one of these.

According to the write up I read it's not the greatest unit on the planet but it works fantastic for my purposes. It came with a video and an instruction manual and there is a free tutorial here as well. I also read over a couple books and discovered that welding is an art form. It's really easy to weld just about anything with a mig welder but it's really hard to get it perfect. I'm not building a race car or even a car that will do any serious off road work so not perfect is fine by me. The most off roading I will do is the occasional dirt trail and beach. When I cut the car to shorten it, I used the section I cut as a practice piece to work on my welding. I must've laid a hundred beads on my scrap metal and also practiced butt welds until I was satisfied with my skills. Nervous as hell, I finally welded the car together and it didn't look perfect, but I did get good penetration on the welds and pan is solid as a rock.

Thursday, September 14, 2006

So it begins.


Breaking a VW bug down to the pan (frame of the car) is a pretty easy task. All you should need is any decent VW manual and access to the web to find what you need. It seems German engineers like four. Four bolts hold the engine on. Four bolts hold the front axle on. Four bolts hold the wheels on (I started with a '68 which has four lug bolts) and so on and so fourth.

The hardest thing about taking the car apart was actually lifting the body off the pan which required two 2x4s about six feet long with me and three friends. I ran one piece of wood under the rear apron and the other through the front between the pan and the trunk. With my three helpers we lifted the body off without much effort. One thing to note is that I worked the body loose before I tried to lift it. There is a seal that fits all around the pan and on a thirty seven year old car this thing requires a little motivation because it doesn't want to let go. So before my friends got there I wiggled everything loose with my four foot pipe. Everyone who works on VWs should have a four foot pipe to use as a pry bar in order remove the nuts on the rear axles of the car. Over all, things went pretty well.

My advise, after taking the thing apart, make sure you do two things. First, get some plastic baggies/trash bags and label them as you take pieces off the car. I did it and it's helped tremendously in putting the car back together. Make sure you label everything as detailed as possible. Second, DON"T throw anything away. Even the lowliest nut or bolt can put a complete halt on your rebuild. There have been several times I've needed that one little part I thought was so insignificant at the time and realized it would've come in real handy later. Even if it was just to match up with the new part I just bought it was would've been worth it. You should even save those parts you don't need to put back on the car. I saved a bunch of stuff and selling it on ebay has helped off set the build costs. Even little things you would think nobody wants like a voltage regulator or the support bar that holds the back seat in place. I stripped the car almost bare but there were still a few things I would've liked to have either to sell or to keep.


Saturday, September 09, 2006

Roll cage just a test pic.

The birth of the Bumble Buggy.

My love of VWs started when I was a kid. My parents were divorced and my dad used to come pick us up in his bus when my brother and I would visit him for the summer. The seed was planted for both my older brother and I at that time. It lay dormant in me for some time until he bought a Super Beetle in high school. I'm sure my brother has good memories of that car and so do I. One of my favorites was when he whipped out of the library one day. The passenger seat came off the track and I (seat and all) ended up sitting in back, first scared, then laughing. Good times.

Eventually I managed to get my own little German wonder. I was well out of college and past my car on the way home. I called the guy, after consulting with my wife, and decided to go look at it. I looked it over well and the only rust I found was under the battery tray which is very common. I decided it was a good value and wrote the guy a check. I fired it up and was off. I instantly was in love with my little faded red bug and vowed to take good care of it. I started to learn all things air cooled like adjusting the valves and the breaks. The car is brilliant in its simplicity and has more character in its left headlight than most cars have from bumper to bumper.

Due to circumstances well within my control, I found myself unemployed not long after I bought it. I looked for a job within my profession while collecting unemployment. I was unable to find one before the checks ran out. So, in desperation, I applied for a job delivering pizza. Imagine the managers surprise when I pull up on my first day of work in a thirty plus year old car. He didn't like it one bit. He would learn better. I put seventy five thousand miles on that little car during that two year stretch and I was the only driver who never called in to work for a break down. On more than one occasion I had a customer tip a couple extra bucks when they saw my bug idling in the driveway. I also had several people try to buy the car from me. One guy offered me four grand for it. I didn't take him seriously and told him "You'll get my bug when you pry it from my cold dead hands." This became my standard answer when people offered to buy it.

Fast forward a couple years and I had found work within my chosen profession. One day, while driving my bug to work the clutch started slipping. The was the first real problem I had. I limped my faithful little car home. Even with a mechanical problem it never left me stranded. I decided it was time to start the restoration. I bought another car so I could get back and forth to work while my bug underwent it's transformation. I started to break the car down and found that I had let the cancer (rust) get too bad. As I removed the fenders and large chunks of metal came out when I removed the bolts. The door pillars were also rusted all to hell under the paint. I reflected long and hard about what to do with it. Giving up on the little car was unthinkable after all we'd been through together. I wanted to restore it but the thought of some unseen rust coming back through after I was done wasn't an option. I had never attempted any body work before and wasn't confident in my skills. Truth be told, I have no formal training in mechanics whatsoever. I have an aptitude and that's all. Everything I've learned up to this point has been from digging in and getting it done. At any rate, I decided that I was going to transform my Beetle into a Manx.

The Manx was the father of all Fiberglas dune buggies. Originally designed by Bruce Meyers, the little kit car took the country by storm for it's ease of construction and plentiful and cheap "donor" cars. When Bruce became successful selling his kit many other companies started to copy the style of the car. Thus came a flood of buggies that are now referred to as "clones" by buggy enthusiasts.

I started to scour The Samba for potential buggy bodies to buy. I was short on funds at the time and I happened to find a guy that was selling, what appeared to be, a solid Manx clone body. I contacted him and found that he was willing to trade the body for some of the '68 parts I had. SWEET! So the body, technically, didn't cost me anything but gas to go get it. It was, however in Oklahoma (hell and gone from Atlanta , GA). It so happened that a guy I knew was getting married in Southern Louisiana and I decided to go pick up the body when I went that direction. I took it as fate. In the end the body only cost me about eighty bucks in gas, two fenders, and one deck lid off my bug. After doing a little research I've determined that my car is a Fiberfab Clodhopper. I think the body has nice lines and I've seen a couple finished that look great.

I'm starting this blog to chronicle the building process that I'm going through to assemble this car. This is to provide a free source of inspiration and ideas about building one of these cars. I've already been working on the car for about a year and I'll be trying to go in chronological order and remember as much stuff as possible about the build. I will also post pics of my progress. Once I'm up to date, I'll start posting weekly updates. Please feel free to comment, ask questions, give advise, tell me I'm an idiot or whatever.