Assumption is the mother of all screw ups.
When it came time to weld some new floor pans on the car I has a brilliant epiphany. I decided to buy the 1/2 floor pans from JC Whitney. I figured, "I'll have to cut the darn things anyway so I'll just buy them already cut." When they arrived I clamped them on the tunnel and started to devise the best way to shorten them up. I decided to trim the fourteen inches off the front floors (ie near the pedal assembly) because it seemed easiest. The floors from JC arrive with extra meat on the inner edge (along the tunnel side) so you can trim them up to your exact needs. In order to fit them, I needed to trim, fit, trim a little more, fit them up, trim some more, fit again, trim some more, fit and motivate with a hammer, ect ect ect. Needless to say, it took some time to get it to fit nicely. Once I did, quite proud of the work I had done, I clamped the floors to the tunnel and grabbed my body for a test fit. Only then did I realize my mistake. The rear floors flare out in the section where you would normally cut the pan. Consequently I had about one inch of metal poking out further than my body.

DOH!!!
Thus a whole days work of cutting and fitting went down the tubes. And that was just for the drivers side! I sat on my work stool and stared at the car dumbfounded. I contemplated my next move. I had a few options.
1. Scrap the whole mess buy some new full pans and start again.
2. Go a completely different route and make my own floors. I wasn't all that pleased with the gage of the metal the JC pans. They were solid but not quite as thick as the German originals.
3. Make the current plan work somehow.
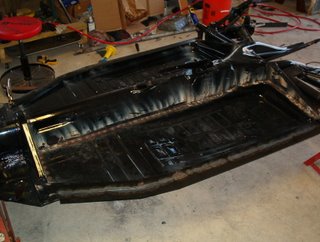
I decided to start from scratch and build my own floors. I started by getting some 2 inch angled steel to run along the outer edge as a support. I lined them up using the body as my guide. I cut a small wedge where the bends were and welded the pieces back together on the horizontal section. I mocked them up and was pleased. I felt more comfortable with 1/4 inch steel along the lower sides than even the thin sheet of the original gage floors. After I had the sides done I went about tackling the actual floors. I searched locally for some suitable gage sheet to use as a floor while I decided the best course of action to fab them. If you look along the lip of the pan you'll discover that it's not flat so you can't just buy a sheet of steel and flop it down for the floors. This would require me to do some serious shaping and at least another day of fitting. I wasn't sure that my skills and tools were up to the task. To make matters worse, I found that a flat piece of sheet metal of suitable dimensions would cost me more than buying completely new full floors. I sat in my garage feeling sorry for myself after hitting an apparent impasse. As I sat there I noticed my 1/2 pans leaning against the wall mocking me. I hatched a brilliant hybrid of #2 and #3 above. What I did was cut the outer edge of my current floors off where they bend down along the outside. This alone gained me 3/4 of an inch from my 1 inch overlap dilemma. With this gained I did some careful trimming and PRESTO I made my already purchased floor pans work by tucking them under the lip of my two inch angled steel. I welded the floor as normal along the inner lip and welded the bottom floors on the underside of my two inch angles. Disaster averted.


A note to the wise. The thin nature of the pans and the fact that I was too cheap to actually invest in shielded gas and thinner wire for my welder means that I had difficulty welding the floors. The shielded wire is intended for thicker metal and will burn holes in the thin sheet if you aren't careful. I tweaked the settings and my technique until I mastered it. It worked well along the edges where there was more meat from the original steel to supplement the floor metal. The area across the open floor was altogether too thin to prevent me from burning through. I know because I practiced on the portions that I cut from the front halves. Welding was out so I bought some steel pop rivets and riveted the two halves together. When it was all done it came out well and I tested it by hopping up and down on the floors (very scientific huh.)
A little, often overlooked, tidbit that I've picked up in my travels is to avoid using different metals when they will come in contact with one another for any period of time. The chemical makeup of dissimilar metals can induce or accelerate corrosion or rust. That's why I specified STEEL rivets because aluminum rivets are equally available in most hardware stores. If you have some on hand and you're not sure just grab a magnet. It wont stick to aluminum. Good quality stainless steel is non magnetic as well. If you take a magnet to "stainless" and it sticks, there's a good chance it will rust in the future.
It was a huge relief to get the floors on and took me way to long but I got-r-done (as they say here in Georgia) and was able to move on to much more mundane things like cleaning more rust. Yay!
posted by Buggy Glenn @ 8:30 PM
0 comments
![]()

0 Comments:
Post a Comment
<< Home